This is dedicated to my first, and now final sump setup. This will cover the design, revision, and replacement of my old sump to my new one. To give some background, I have a 250 gallon tank 7 by 2 by a little over 2ft tall. When I purchased this I knew I didn't want to use canister filters, and decided on a sump. I had an extra 75 gallon laying around that I knew I wanted to use for the sump on this tank. I went to home depot and bought some 1/16th glass for the dividers. ( Learn from your mistakes, this was a big one for me ). I ordered some silicone from amazon to seal the new panes in place ( LINK - https://a.co/d/b2NYeQH ) . Having watched a quick you tube video before placing them where I wanted them, I glued them in place. Happy with how it turned out, I installed it after about a week of it sitting
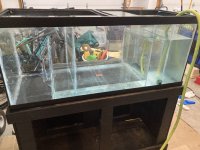
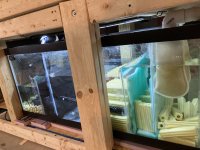
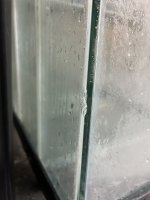
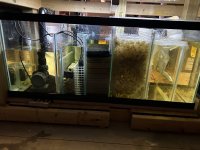
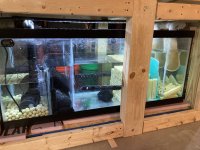 ( You don't need to wait this long for silicone to dry, but it may take this long due to humidity, the thickness of the bead, and the conditions that the tank is placed in. Also be sure to water test before installing ). I got it running on my tank, and then about a week later the last baffle broke leading to the pump. This was due to the amount of water that it was holding back and the lack of integrity in the glass because it was so thin. For the next several months, I let the sump run how it wanted to. I didn't have the time nor energy to drag the sump out and replace it with a new one. This was a good thing, because it also gave me time to decide on what I wanted to go into the next one. As time went on, more of the old dividers broke inside the sump, leading to a larger disruption of water flow that I couldn't control inside of it. While this is not a bad thing, this was not the intent of my design and bothered me, however the quality of the water and the health of the fish did not suffer even though the sump was not running the way that I wanted it to. After roughly a year of using that sump, I started on its replacement. I bought another 75 gallon tank, and contacted my local glass shop if they were able to create me some interior panels. They were, and I ordered the specific panels after calculating what I wanted in my new design and worked out how I wanted it to function. ( New glass was roughly 3/16 thick and tempered ). Again, I bought some silicone and sealed the new panels in place. I water tested each of the chambers individually, and found them to be properly sealed. I also have a crack in the sump, however with the depth that it is in the glass, and how reinforced the tank is with all the extra glass I have the utmost confidence in the tank. I hasn't failed yet and I don't plan on it going soon.
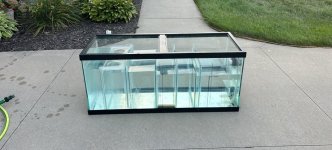
I then installed the new sump under my tank, and have been with it since.
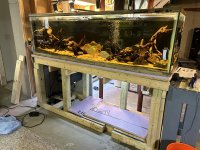
This is not an entirely in depth thread and it's not meant to be. This is what I found and had to go through to get where I am today. I have plans in place in the future to dive further into creating your own sump, and answering both common and complicated questions related to sumps, such as plumbing and overflows, as well as interior sump design for specific tanks or functions. The way I do things may not be the way you will, but this is here to provoke inspiration and thought about your own design.


 ( You don't need to wait this long for silicone to dry, but it may take this long due to humidity, the thickness of the bead, and the conditions that the tank is placed in. Also be sure to water test before installing ). I got it running on my tank, and then about a week later the last baffle broke leading to the pump. This was due to the amount of water that it was holding back and the lack of integrity in the glass because it was so thin. For the next several months, I let the sump run how it wanted to. I didn't have the time nor energy to drag the sump out and replace it with a new one. This was a good thing, because it also gave me time to decide on what I wanted to go into the next one. As time went on, more of the old dividers broke inside the sump, leading to a larger disruption of water flow that I couldn't control inside of it. While this is not a bad thing, this was not the intent of my design and bothered me, however the quality of the water and the health of the fish did not suffer even though the sump was not running the way that I wanted it to. After roughly a year of using that sump, I started on its replacement. I bought another 75 gallon tank, and contacted my local glass shop if they were able to create me some interior panels. They were, and I ordered the specific panels after calculating what I wanted in my new design and worked out how I wanted it to function. ( New glass was roughly 3/16 thick and tempered ). Again, I bought some silicone and sealed the new panels in place. I water tested each of the chambers individually, and found them to be properly sealed. I also have a crack in the sump, however with the depth that it is in the glass, and how reinforced the tank is with all the extra glass I have the utmost confidence in the tank. I hasn't failed yet and I don't plan on it going soon.

I then installed the new sump under my tank, and have been with it since.


This is not an entirely in depth thread and it's not meant to be. This is what I found and had to go through to get where I am today. I have plans in place in the future to dive further into creating your own sump, and answering both common and complicated questions related to sumps, such as plumbing and overflows, as well as interior sump design for specific tanks or functions. The way I do things may not be the way you will, but this is here to provoke inspiration and thought about your own design.

